How to make brilliant home brew
Brewing brilliant beer at home is extraordinarily easy with our brew-in-a-bag (BIAB) method.
If you've ever made porridge, it's kinda like that but rather than a bowl of sloppy mess, you'll end up with fizzy, hoppy, golden goodness.
Here we've broken the brewing process down into 5 simple steps to help you understand how easy brewing great tasting beer is.
Our brewing instructions that come with any of our kits go much more in-depth in terms of timings & temperatures.

1. Sterilisation
Time : 10 minutes
What for : avoid any pesky bacteria messing up the beer
Before you get started there is one not-so-fun but oh-so-necessary thing to do.
Brewing is a simple process, but we've got to make sure we give the ingredients the best chance of turning into delicious beer.
So before you start, clear all the surfaces and properly sterilise the equipment that's going to come into contact with the brewing ingredients. We provide sterilising tablets in our kits to make this process super simple.

2. Mash
Time : 1 hour
What for : get all that goodness out of the grains
Now to get to the fun part.
Mashing the grains is the process of getting the sugars, flavour & colour out from the grain by steeping them in hot water.
During the mash, starch from the malt is released and converted into sugars. Different types of sugars help determine alcohol content, body, and mouthfeel, and the mash temperature determines how many sugars, and which type, make it into the wort.

3. Boil
Time : 1 hour
What for : develop & add flavour to the beer
Because we use our brew-in-a-bag method, you can think of this bit like removing a giant teabag (kinda). Once the mash time is up, all you need to do is lift out the bag of spent grains, crank up the heat and add in the hops.
Hops all smell great but they are all quite different. Some are used more for flavour & bittering, and others more for aroma.
As a rule of thumb the hops we add early on in the boil will contribute more flavour & bitterness whilst those we choose to add at the end of the boil are more for their great smell.

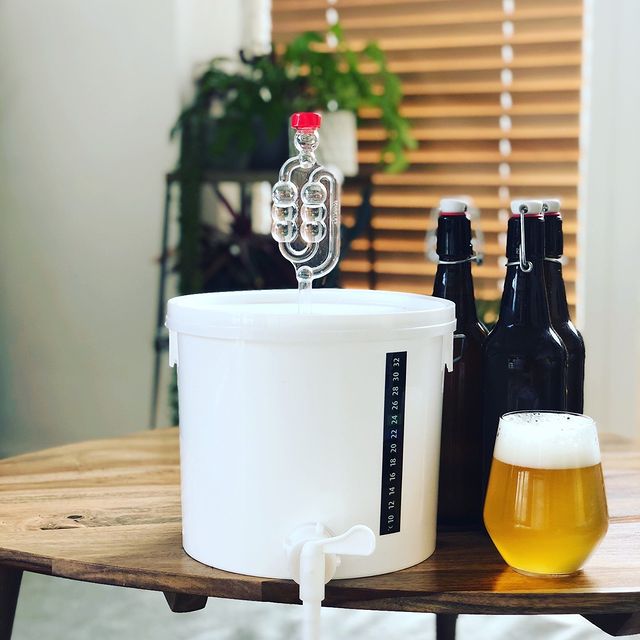
4. Fermentation
Time : 2 weeks
What for : to make your beer boozy
Before we transfer the brew into it's fermenting bucket home for the next 2 weeks we "Cold-Crash" it by placing the pot in ice-cold water.
We need to chill the wort before we can add the yeast, as yeast is not a fan of hot stuff.
Now it's time to transfer the wort to the fermenting bucket and add the yeast. The yeast eats up the sugars you made in the mashing process, making the beer alcoholic, carbonated and adding flavours.
Leave the yeast to do its thing in the fermenting bucket for 2 weeks. When fermenting, you want to leave the beer in a dark place with a constant temperature.
5. Bottling
Time : 2 weeks
What for : to make your beer fizzy
Almost there folks! You'll need to sterilise your bottles to make sure you can enjoy your hard work in a couple of weeks time. Once you have, add some sugar to warm water and pour into the fermenting bucket. The sugar reactivates the yeast to make sure your beer comes out perfectly carbonated.
Use the bottling wand to easily transfer the beer into the bottles, pop the caps on them and leave in the same dark place for another 2 weeks to complete the brewing process.

6. Last & Best Step : Drinking
Time : down to you
What for : well, obviously...
2 weeks in the bottles done?
Perfect.
Time to crack a cold one. Now, we highly recommend you put your bottles in the fridge at least overnight, before you enjoy them. They'll be properly chilled and better clarified this way.
When you pour the beer, pour slowly to avoid sediment in the bottle going into the glass but also make sure you pour a nice head on the beer - this helps to truly enjoy the aroma and taste of your brilliant, home-brewed beer.
Cheers!


Comments
Steph @ Bottle Topped —
Hey Dave!
With this set-up, there will be some sediment in the bottles. Best thing is to look at your bottling process to ensure the sediment is not mixed up with the beer. The other key aspect is to store your beer upright, and when you pour your beer, halt the pour just before the sediment leaves the bottle neck. You’re aiming to leave about the last centimetre of beer in the bottle. Make sure your glass is big enough to take the whole pour; if you have to stop and start, there’s a good chance you’ll stir up the sediment.
Dave Boydell —
Love these kits, done a few and going to do more!
My big ol’ question is, how can I reduce the amount of sediment getting into the bottles? Or is it just something I can’t avoid with this set up (I’ve been using the 5GL starter kit for a while).